With 18 pounds of gooseberries in the freezer, I decided it was time to do something with them. And as I love gooseberry jam, that was top of the list.
It's not the first time I've made gooseberry jam, but it's been a while, so I looked up various recipes to check ingredients and time etc. There was a lot of variation in the amount of water to use, one website saying 150ml of water per kilo of gooseberries, another saying 600ml. I decided not to worry too much: it's easy enough to add more water while it's cooking or to let it cook longer, depending on how runny it looks in the pan.
I'm useless at metric measurements, so did some rough conversions as follows. As 1 kilo is about 2.2lb, and I was using 4lb of gooseberries, I decided it was close enough to say 2 kilos. Therefore I needed somewhere between 300ml and 1200ml of water. There are 568ml to 1 pint. Therefore 300ml is just over half a pint and 1200 ml is just over 2 pints. I chose to split the difference and use about 1.5 pints of water.
The last batch of gooseberry jam was a bit thick and a bit sweet - the taste of gooseberries seemed to be a bit lost in the sugar - so this time I decided to reduce the sugar a little bit.
The recipe I used is therefore:
4lbs gooseberries
3.5lbs granulated sugar
1.5 pints water
Makes 5.5 normal size jam jars
I started by putting empty jam jars in the dishwasher to sterilise them and warm them up. When the dishwasher had finished (while I was cooking the jam), I put the jars into the oven on gas mark 1 to keep them hot - we don't want jam jars to explode when we put the jam in!
I topped and tailed the gooseberries. This is easiest done when the gooseberries are frozen - the stalk and the bottom bit scrape off very easily with a finger nail, and you don't squish the gooseberries all over the place either!
I put them in the cooking pot with the water and turned on to a normal cooking heat. I let them bubble away for an hour or so, stirring occasionally to help the gooseberries break down. This was a normal boil, not a rolling boil - no need for the rolling boil at this stage.
When the skins have really softened up and broken down, it's time to add the sugar. Apparently, once the sugar is added, the gooseberry skins won't soften or break down any more. Turn the gas down first and add the sugar, stirring well to make sure it all disolves.
Then it's time to turn the gas up again. I didn't bother with a really high rolling boil, just a very-slightly-higher-than-normal boil. I kept that going for another 10 minutes or so while some small plates were chilling in the freezer. Every few minutes after that, I put a small blob of jam onto a chilled plate, waited 30 seconds and tested for a wrinkle. As soon as I got a wrinkle, I turned the gas off.
Then I ladelled the whole lot into the jars and put the lids on while still hot and left them to cool.
Verdict: Lovely jam! Got a good set without having to boil the living shit out of it. Got a lovely taste using slightly less sugar than in other recipes. Friends and neighbours have had 3 jars already. Looks like I'll have to make some more pretty soon ....
Monday, 21 November 2011
Wednesday, 16 November 2011
Elephant Garlic

It's been a long time coming, but finally got some elephant garlic!
The missus went to Masterchef at Olympia the other day, and one of the stalls was selling it. They had 3 cloves left so she snapped them up. And they are huge!
Elephant garlic is not a true garlic - it's more closely related to leeks than to garlic, but forms a bulb of cloves like garlic does. It has a milder taste than normal garlic.
Having read up on growing elephant garlic, I have decided to grow it in large deep pots. They are the 9 and 10 inch pots that I normally use for tomatoes. I have used basic compost from the garden centre.
Sunday, 30 October 2011
Rhubarb & Ginger Jam
 Having sorted the chest freezer out, decided it was time to crack on and use up some of the fruit. Rhubarb and ginger jam sounded good to me!
2lb rhubarb, chopped
2lb sugar
juice of 2 lemons
40g ginger
Makes 3 jars.
OK, so I've mixed Imperial and metric measurements. I'm useless with metric measurements. We found some frozen ginger in Sainsburys, and it's conveniently squished into 20g blocks, so used two of those, and it's easier to simply use the known metric weights than try and convert them.
Anyway, to make the jam, we put the chopped rhubarb and the sugar into a bowl and left it overnight for the rhubarb juices to absorb the sugar. All the recipes we looked at said to do this, but some for 2 hours, some for 24 hours. I decided overnight was enough, and gave it a stir before bed. I gave it another stir first thing in the morning, by which time, the rhubarb was in a lovely sugary syrup.
I then put some jam jars in the dishwasher and when that finished, put them in the oven at gas mark 1 to keep them hot - putting hot jam into a cold jam jar isn't a good idea (apparently!).
I then put the jam on the heat, bringing it to a boil. I added the ginger and lemon juice while it was heating up. I haven't yet found out how much juice is in one lemon, so I just poured a few tablespoons of Jif lemon juice in.
After about 20 minutes, I tested if it had reached the setting point by dropping a small blob of jam onto a cold saucer and testing if it wrinkled when pushed. It didn't seem to wrinkle easily, so kept the jam on the gas a bit longer. I tested again, but still wasn't sure, so I took a chance and stopped the boiling, and poured the jam into the hot jam jars and put the lids on.
When it had cooled down, I tried the jam - it was a bit too thick, but ok. Maybe too much lemon juice? It wasn't as gingery as I'd hoped for, so might double the ginger next time.
Tuesday, 18 October 2011
Pickled Onions - Part 1
Some of the onions didn't grow much - barely worth the effort of peeling, slicing and cooking - so decided to pickle them! And they are the perfect size too!
We have some red and some yellow, so we're going to pickle some of each. Having looked at various pickled onion recipies, we're going to pickle some in pickling vinegar and some in malt vinegar with a mix of spices.
We topped, tailed and peeled the first batch of onions and put the in a bowl of salty water, using a small plate to push the onions below the water. The salty water apparently helps to partially separate the layers in the onions, which helps to let the pickling spices penetrate the whole onion. We left them there for 24 hours before rinsing and drying them.
Once dry, we put the onions into two jars. We re-use old jars rather than buying new: we don't like waste, old jars are perfectly fine so long as they're cleaned and sterilised. One jar is an Uncle Ben's jar, the other was a Sainsbury's jam jar - we chose these as they were the right size for all the onions we'd prepared. Both were washed in the dishwasher and then sterilised with some boiling water. We then packed the onions into the two jars.
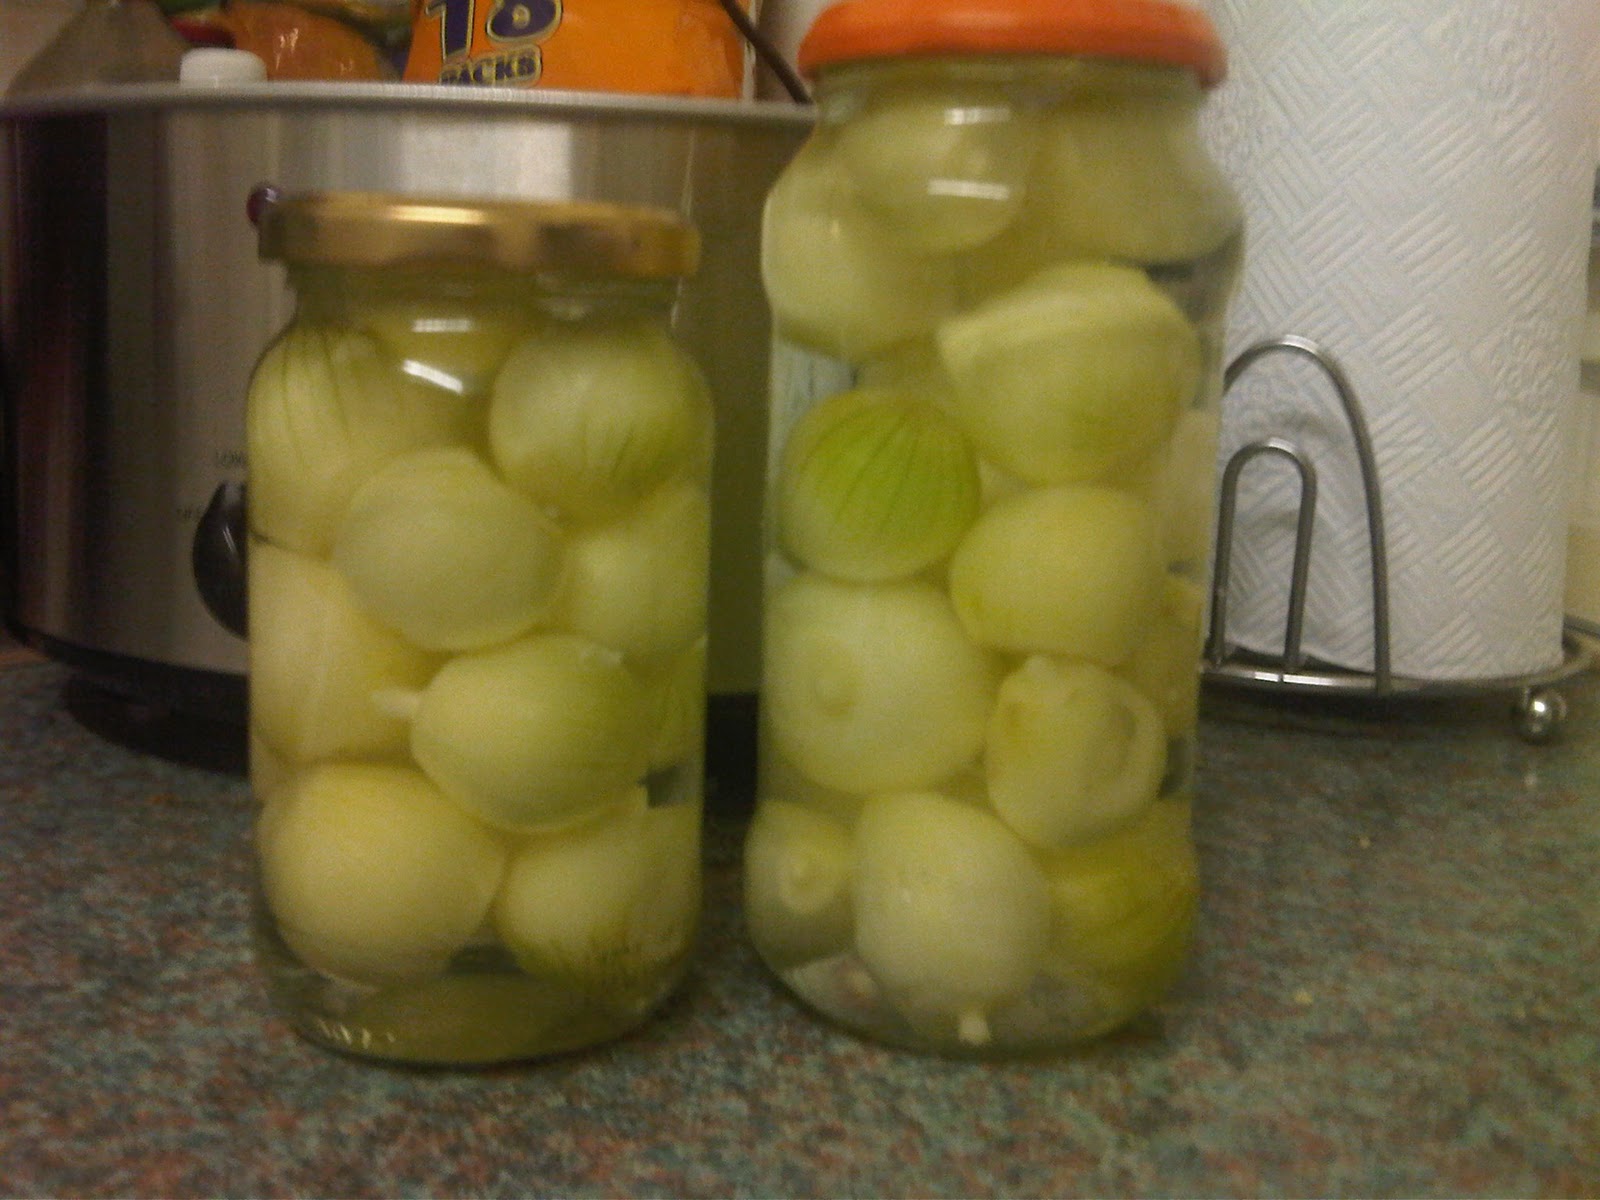
For the first batch of onions, we chose to use Sarson's pickling vinegar, partially because it's one of those on the list to try, and partially to save time on preparation. We poured the pickling vinegar in to the jars, filling both to the top, then put the lids on. Job done! And here they are:

These will stay in the cupboard for a couple of months or so before we try them. We'll do the next batch soon ...
We have some red and some yellow, so we're going to pickle some of each. Having looked at various pickled onion recipies, we're going to pickle some in pickling vinegar and some in malt vinegar with a mix of spices.
We topped, tailed and peeled the first batch of onions and put the in a bowl of salty water, using a small plate to push the onions below the water. The salty water apparently helps to partially separate the layers in the onions, which helps to let the pickling spices penetrate the whole onion. We left them there for 24 hours before rinsing and drying them.
Once dry, we put the onions into two jars. We re-use old jars rather than buying new: we don't like waste, old jars are perfectly fine so long as they're cleaned and sterilised. One jar is an Uncle Ben's jar, the other was a Sainsbury's jam jar - we chose these as they were the right size for all the onions we'd prepared. Both were washed in the dishwasher and then sterilised with some boiling water. We then packed the onions into the two jars.
For the first batch of onions, we chose to use Sarson's pickling vinegar, partially because it's one of those on the list to try, and partially to save time on preparation. We poured the pickling vinegar in to the jars, filling both to the top, then put the lids on. Job done! And here they are:
These will stay in the cupboard for a couple of months or so before we try them. We'll do the next batch soon ...
Sunday, 16 October 2011
Herbs
We have started some herbs for indoor growing over the winter. We are starting some in the greenhouse too, to see how they cope over the winter. It doesn't matter if they fail as we have plenty more seeds to sow more in the spring.
Sowings so far:
2 Chives
2 Coriander Cilantro
2 Red Basil
2 Russian Tarragon
4 Thyme Old English
4 Sage
We've also sown a cell tray of:
8 Mint
8 Red Basil
8 Sweet Basil
We'll need to sow a lot more herbs sometime soon. We're planning to have lots of sage plants in tubs in between all the brassicas next year - apparently these help keep the cabbage white's off the brassicas - we don't want the veggies ruined by caterpillars!
Reminder - we must look up "companion planting" - the art of planting one thing with something else to ward off pests!
Saturday, 15 October 2011
Winter Onions
We stopped off at the garden centre today and picked up some onion sets for overwintering. Varieties are:
Electric (Red)
Troy (Yellow)
Senshyu (Yellow)
Each pack has approx 50 onions.
In the past, I have started onions in 2 inch round pots. 2 or 3 weeks later, I dig over the onion bed and clear all the weeds, and then plant out the onions. By this time, they normally have good roots and the stems have reached 4-6 inches. This gives them a really good headstart against the weeds.
In spring this year, I was working full time, which meant I didn't have time to plant in pots and transplant later, so I planted the onion sets directly into a freshly dug onion bed. Sadly the weeds took control and the onions didn't grow very well.
Today I reverted to the old method. Some were a bit dried out and simply won't grow, but as there are normally a few extra in each pack, we managed to get 150 onions into the small pots. All are in the greenhouse now.
Overwintering Update
2 weeks ago we started sowings for overwintering. The results so far are:
Garlic - shoots are now 2 inches tall
Carrots (Early Nantes) - seedlings are now 1 inch tall
The seeds we sowed in the cells have sprouted, but we used home made compost which turned out to have some sort of weed seeds in it. Luckily these weeds are easily identified with the Cauliflower and cabbage, but we're not sure if the Strawberries have sprouted yet.
Lettuce (Winter Gem) - some have sprouted, maybe to half an inch or so
Cauliflower (All Year Round) - seedlings are coming on well, most are between 1 and 2 inches tall
Cabbage (Durham Early) - about 8 out of the 12 have sprouted to about 1 inch tall
Cabbage (Winter Jewel) - all 12 have sprouted well, looking healthy
Strawberry (Sarian) - some green growth, not sure if weeds or strawberries - will have to wait longer ....
Monday, 3 October 2011
Back in Business
Sat 24th September we raided Wyevale for the 50p seed clearout. Got loads!
Sowed various seeds that should grow over the winter in the greenhouse:
2 tubs Early Nantes carrots
24 lettuce Winter Gem
24 strawberry Sarian
24 cauliflower All Year Round
12 cabbage Durham Early
12 cabbage Winter Jewel
1 tub of garlic
The lettuce, cabbage, cauliflower and strawberries were all sprouting within a few days. These will be transplanted into pots in the greenhouse when they're big enough.
The carrot tubs will probably stay in the greenhouse all winter. Hopefully they'll be ready in spring.
The first garlic clove was showing a small green shoot within a week. The garlic tub will stay outside through the winter so that the frost gets to it and makes the bulbs split.
I've dug up half the potato bed - got one bucket of new potatoes. The other half will be dug up when the bucket is empty!
We've picked loads of apples. Some have been peeled and sliced and frozen - these will make good crumbles throughout the winter. I still have loads of blackberries frozen too, so we'll have variety with crumbles etc. We've also had apple sauce with our roast this weekend.
The Last Year or So ...
It's been a looooong time since the last post. Life just got in the way.
Last summer I decided to change my life - I'd spent 10 years as a single parent, working mostly from home, and was bored of my own company, so it was time to change. I reorganised the house, did some decorating and got a lodger in. I then went and got a full time job at the end of August - long hours with a long drive each way every day.
I kept the veggie patch and allotment going, had quite a lot of fruit and veg last year. However, once the full time work started, I didn't get the time to do very much with the veggies. Most of what hadn't been picked by the time I started the job was lost. I did get up to the allotment and dug up loads of spuds though, which was good.
Early this year, I made a pretty good start. I dug over 2 beds on the allotment and planted some seedlings out, and tidied up the whole veggie patch at home, digging up loads of spuds that survived the winter. I sowed loads of seeds in the greenhouse and planted spuds, carrots and onions at home.
But then we had a mini heatwave in about April or May (I forget which) and the seedlings all cooked in the greenhouse. I didn't have time to get to the allotment, so everything there died off too. So many other things happened in life and I just didn't have the time, energy or enthusiasm to start the seeds again. The weeds quickly took hold in the veggie patch and the allotment, so I decided to write the whole year off.
In the summer, I decided it was best to give up the allotment plot to someone who had the time to make good use of it.
Then in late summer, I got myself a girlfriend .... and she loves growing veggies too! Not just that, but she loves to cook - and loves making pickles and chutneys and jams and all sorts! Between us we're tidying up the veggie patch and preparing for a good year of growing. We've already made a start with sowing new veggies for overwintering ....
Subscribe to:
Comments (Atom)